7章 CordovaでHelloWorld! - 【連載】ハイブリッドアプリの最新情報とその動向【Corodva】
【連載】ハイブリッドアプリの最新情報とその動向【Corodva】

7章 CordovaでHelloWorld!
前回まででハイブリッドアプリの開発環境構築が終わったので、今回から実装にはいるけど、まずはHelloWorld!の出力まで。 とりあえず連載はここで終了にして、angularJSだったり、ハイブリッドアプリ開発ではまったところとかをまとめていきたい。ただAndroid系の環境構築に関してもう少し詳細な説明が必要な部分もあるので、 時間のあるときに追記する予定。

前回のおさらいも兼ねて、プロジェクトの作成から。
プロジェクトの作成
まず、Cordovaをインストールしたディレクトリに移動する。 基本的には /usr/local/bin のはず。
$ cd /usr/local/bin
ここでプロジェクトの作成。例では「TestCordova」という名称のサンプルプロジェクトを作成する。
$ cordova create TestCordova
これでプロジェクトが作成された。
成功すれば以下のように表示される。
Creating a new cordova project.
ソースの修正方法
先ほど作成した「TestCordova」プロジェクトのwwwディレクトリの中のファイルを編集していくことになる。まずはプロジェクトディレクトリに移動する。
$ cd /usr/local/bin/TestCordova
このディレクトリのwwwを開く。
$ open www
すると、画像のようにwwwディレクトリの中身が表示される。

ここにある、「index.html」がアプリ起動時に表示されるので、HelloWorld!を表示するにはこのファイルを編集。適当なエディタでindex.htmlを開く。デフォルトでは以下のような記述がされているはず。
<!DOCTYPE html>
<!--
Licensed to the Apache Software Foundation (ASF) under one
or more contributor license agreements. See the NOTICE file
distributed with this work for additional information
regarding copyright ownership. The ASF licenses this file
to you under the Apache License, Version 2.0 (the
"License"); you may not use this file except in compliance
with the License. You may obtain a copy of the License athttp://www.apache.org/licenses/LICENSE-2.0
Unless required by applicable law or agreed to in writing,
software distributed under the License is distributed on an
"AS IS" BASIS, WITHOUT WARRANTIES OR CONDITIONS OF ANY
KIND, either express or implied. See the License for the
specific language governing permissions and limitations
under the License.
-->
<html>
<head>
<!--
Customize this policy to fit your own app's needs. For more guidance, see:
https://github.com/apache/cordova-plugin-whitelist/blob/master/README.md#content-security-policy
Some notes:
* gap: is required only on iOS (when using UIWebView) and is needed for JS->native communication
* https://ssl.gstatic.com is required only on Android and is needed for TalkBack to function properly
* Disables use of inline scripts in order to mitigate risk of XSS vulnerabilities. To change this:
* Enable inline JS: add 'unsafe-inline' to default-src
-->
<meta http-equiv="Content-Security-Policy" content="default-src 'self' data: gap: https://ssl.gstatic.com 'unsafe-eval'; style-src 'self' 'unsafe-inline'; media-src *">
<meta name="format-detection" content="telephone=no">
<meta name="msapplication-tap-highlight" content="no">
<meta name="viewport" content="user-scalable=no, initial-scale=1, maximum-scale=1, minimum-scale=1, width=device-width">
<link rel="stylesheet" type="text/css" href="css/index.css">
<title>Hello World</title>
</head>
<body>
<div class="app">
<h1>Apache Cordova</h1>
<div id="deviceready" class="blink">
<p class="event listening">Connecting to Device</p>
<p class="event received">Device is Ready</p>
</div>
</div>
<script type="text/javascript" src="cordova.js"></script>
<script type="text/javascript" src="js/index.js"></script>
</body>
</html
このファイルを以下のように変更してセーブ。(いらない部分は削除した)
<!DOCTYPE html>
<html>
<head>
<meta http-equiv="Content-Security-Policy" content="default-src 'self' data: gap: https://ssl.gstatic.com 'unsafe-eval'; style-src 'self' 'unsafe-inline'; media-src *">
<meta name="format-detection" content="telephone=no">
<meta name="msapplication-tap-highlight" content="no">
<meta name="viewport" content="user-scalable=no, initial-scale=1, maximum-scale=1, minimum-scale=1, width=device-width">
<link rel="stylesheet" type="text/css" href="css/index.css">
<title>Hello World</title>
</head>
<body>
<div class="app">
<h1>Apache Cordova</h1>
<div id="deviceready" class="blink">
<p class="event listening">Connecting to Device</p>
<p class="event received">Hello WOrld!</p>
</div>
</div>
<script type="text/javascript" src="cordova.js"></script>
<script type="text/javascript" src="js/index.js"></script>
</body>
</html>
これでソース編集は終了。あとはちゃんと表示されるかをエミュレータを使って確認する。
HelloWorld!の確認
プロジェクトのディレクトリ内でビルドコマンドをたたく。
$ cordova build
特定のプラットフォーム向けのビルドなら以下のように、末尾に対象のプラットフォームを記述すればいい。
$ cordova build ios
$ cordova build android
など。「** BUILD SUCCEEDED **」と表示されたらOK。
最後にエミュレータを起動して、編集した内容が反映されているかの確認。
$ cordova emulate ios
$ cordova emulate android
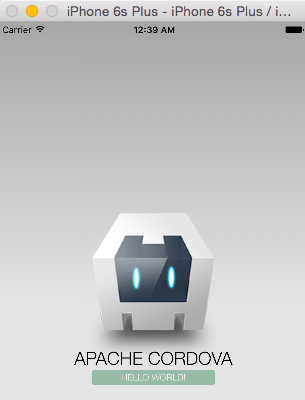
これらを実行するとエミュレータが起動する。実際に、以下のような画面が表示されれば完了。Androidも外枠が異なるだけで、表示される画面は同じ。
HelloWorldは背景が緑色の部分に表示されている。

後は自由にwwwディレクトリ以下を編集していくだけ。

今回までで、ハイブリッドアプリの概要から開発環境構築、そしてHelloWorld!の表示までを連載としてまとめてきた。
次回以降も何か目的を持って、記事をまとめていく。予定としては、現在作っているアプリの実装に関するメモ、を記事にしていくつもり。
OnsenUIとAngularJSを使う予定だったが、OnsenUIがAngularJSから離れた(使えないわけではない)ことと、AngularJSが1.0系と互換性のない2.0系をリリースする予定(現在、Beta版)ということもあって迷い中。
ただAngularJSは個人的にかなり気に入っているので使っていきたい。
以上